1.Overview of Automatic Storage Management (ASM)
Automatic Storage Management (ASM) simplifies administration of Oracle related files by allowing the administrator to reference disk groups rather than individual disks and files, which are managed by ASM.
The ASM functionality is an extension of the Oracle Managed Files (OMF) functionality that also includes striping and mirroring to provide balanced and secure storage.
The new ASM functionality can be used in combination with existing raw and cooked file systems, along with OMF and manually managed files.
The ASM functionality is controlled by an ASM instance.
This is not a full database instance, just the memory structures and as such is very small and lightweight.
The main components of ASM are disk groups, each of which comprise of several physical disks that are controlled as a single unit.
The physical disks are known as ASM disks, while the files that reside on the disks are know as ASM files. T
he locations and names for the files are controlled by ASM, but user-friendly aliases and directory structures can be defined for ease of reference.
The level of redundancy and the granularity of the striping can be controlled using templates. Default templates are provided for each file type stored by ASM, but additional templates can be defined as needed.
Failure groups are defined within a disk group to support the required level of redundancy.
For two-way mirroring you would expect a disk group to contain two failure groups so individual files are written to two locations.
In summary ASM provides the following functionality:
Manages groups of disks, called disk groups.
Manages disk redundancy within a disk group.
Provides near-optimal I/O balancing without any manual tuning.
Enables management of database objects without specifying mount points and filenames.
Supports large files.
It is worth taking a quick look at the following section of the documentation to familiarize yourself with the basic requirements recommendations for ASM.
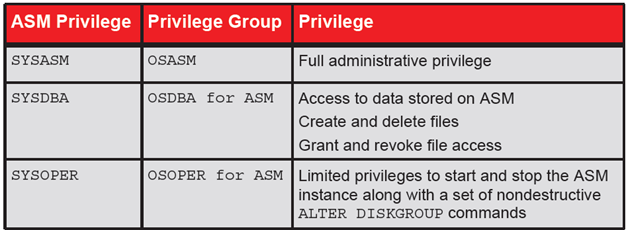
ASM Privilege

2. Initialization Parameters and ASM Instance Creation
The initialization parameters that are of specific interest for an ASM instance are:
INSTANCE_TYPE – Set to ASM or RDBMS depending on the instance type. The default is RDBMS.This is only mandatory parameter.
DB_UNIQUE_NAME – Specifies a globally unique name for the database. This defaults to +ASM but must be altered if you intend to run multiple ASM instances.
ASM_POWER_LIMIT -The maximum power for a rebalancing operation on an ASM instance. The valid values range from 1 to 11, with 1 being the default. The higher the limit the more resources are allocated resulting in faster rebalancing operations. This value is also used as the default when the POWER clause is omitted from a rebalance operation.
ASM_DISKGROUPS – The list of disk groups that should be mounted by an ASM instance during instance startup, or by the ALTER DISKGROUP ALL MOUNT statement. ASM configuration changes are automatically reflected in this parameter.This is ignored in nomount or ALTER DISGROUP ALL MOUNT command.By default the diskgroup which has ocr,votedisk and spfile will be mounteded automatically or which are mentioned in this parameter.
ASM_DISKSTRING – Specifies a value that can be used to limit the disks considered for discovery. Altering the default value may improve the speed of disk group mount time and the speed of adding a disk to a disk group. Changing the parameter to a value which prevents the discovery of already mounted disks results in an error. The default value is NULL allowing all suitable disks to be considered.
Incorrect usage of parameters in ASM or RDBMS instances result in ORA-15021 errors.
To create an ASM instance first create a file called “init+ASM.ora” in the “/tmp” directory containing the following information.
INSTANCE_TYPE=ASM
Next, using SQL*Plus connect to the idle instance.
The ASM instance is now ready to use for creating and mounting disk groups. To shutdown the ASM instance issue the following command.
SQL> shutdown
ASM instance shutdown
SQL>
Once an ASM instance is present disk groups can be used for the following parameters in database instances (INSTANCE_TYPE=RDBMS) to allow ASM file creation:
- DB_CREATE_FILE_DEST
- DB_CREATE_ONLINE_LOG_DEST_n
- DB_RECOVERY_FILE_DEST
- CONTROL_FILES
- LOG_ARCHIVE_DEST_n
- LOG_ARCHIVE_DEST
- STANDBY_ARCHIVE_DEST
3. Startup and Shutdown of ASM Instances
ASM instance are started and stopped in a similar way to normal database instances. The options for the STARTUP command are:
FORCE – Performs a SHUTDOWN ABORT before restarting the ASM instance.
MOUNT – Starts the ASM instance and mounts the disk groups specified by the ASM_DISKGROUPS parameter.
NOMOUNT – Starts the ASM instance without mounting any disk groups.
OPEN – This is not a valid option for an ASM instance.
The options for the SHUTDOWN command are:
NORMAL – The ASM instance waits for all connected ASM instances and SQL sessions to exit then shuts down.
IMMEDIATE – The ASM instance waits for any SQL transactions to complete then shuts down. It doesn’t wait for sessions to exit.
TRANSACTIONAL – Same as IMMEDIATE.
ABORT – The ASM instance shuts down instantly.
4. Administering ASM Disk Groups
There are a few basic points to consider when planning to use ASM:
In most cases you will only need two disk groups (DATA and FRA), where DATA holds all database related files and FRA holds the fast recovery area, including multiplexed copies on online redo logs and controlfiles. Typically, the FRA disk group will be twice the size of the DATA disk group, since it must hold all backups.
Oracle recommend a minimum of 4 LUNs per disk group, with LUNs using hardware RAID and external redundancy if possible.
All LUNs within a disk group should be the same size and have the same performance characteristics.
LUNs should be made up from disks dedicated to Oracle, not shared with other applications.
Now let’s look at basic administration of disk groups.
Disks
Disk groups are created using the CREATE DISKGROUP statement. This statement allows you to specify the level of redundancy:
NORMAL REDUNDANCY – Two-way mirroring, requiring two failure groups.
HIGH REDUNDANCY – Three-way mirroring, requiring three failure groups.
EXTERNAL REDUNDANCY – No mirroring for disks that are already protected using hardware mirroring or RAID. If you have hardware RAID it should be used in preference to ASM redundancy, so this will be the standard option for most installations.
In addition failure groups and preferred names for disks can be defined. If the NAME clause is omitted the disks are given a system generated name like “disk_group_1_0001”.
The FORCE option can be used to move a disk from another disk group into this one.
Disk groups can be deleted using the DROP DISKGROUP statement.
DROP DISKGROUP disk_group_1 INCLUDING CONTENTS;
Disks can be added or removed from disk groups using the ALTER DISKGROUP statement. Remember that the wildcard “*” can be used to reference disks so long as the resulting string does not match a disk already used by an existing disk group.
— Add disks.
— Drop a disk.
ALTER DISKGROUP disk_group_1 DROP DISK diska2;
Disks can be resized using the RESIZE clause of the ALTER DISKGROUP statement.
The statement can be used to resize individual disks, all disks in a failure group or all disks in the disk group.
If the SIZE clause is omitted the disks are resized to the size of the disk returned by the OS.
— Resize a specific disk.
ALTER DISKGROUP disk_group_1 RESIZE DISK diska1 SIZE 100G;
— Resize all disks in a failure group.
ALTER DISKGROUP disk_group_1 RESIZE DISKS IN FAILGROUP failure_group_1 SIZE 100G;
— Resize all disks in a disk group.
ALTER DISKGROUP disk_group_1 RESIZE ALL SIZE 100G;
The UNDROP DISKS clause of the ALTER DISKGROUP statement allows pending disk drops to be undone. It will not revert drops that have completed, or disk drops associated with the dropping of a disk group.
ALTER DISKGROUP disk_group_1 UNDROP DISKS;
Disk groups can be rebalanced manually using the REBALANCE clause of the ALTER DISKGROUP statement. If the POWER clause is omitted the ASM_POWER_LIMIT parameter value is used. Rebalancing is only needed when the speed of the automatic rebalancing is not appropriate.
ALTER DISKGROUP disk_group_1 REBALANCE POWER 5;
Disk groups are mounted at ASM instance startup and unmounted at ASM instance shutdown. Manual mounting and dismounting can be accomplished using the ALTER DISKGROUP statement as seen below.
ALTER DISKGROUP ALL DISMOUNT;
ALTER DISKGROUP ALL MOUNT;
ALTER DISKGROUP disk_group_1 DISMOUNT;
ALTER DISKGROUP disk_group_1 MOUNT;

Templates
Templates are named groups of attributes that can be applied to the files within a disk group. The following example show how templates can be created, altered and dropped.
— Create a new template.
ALTER DISKGROUP disk_group_1 ADD TEMPLATE my_template ATTRIBUTES (MIRROR FINE);
— Modify template.
ALTER DISKGROUP disk_group_1 ALTER TEMPLATE my_template ATTRIBUTES (COARSE);
— Drop template.
ALTER DISKGROUP disk_group_1 DROP TEMPLATE my_template;
Available attributes include:
UNPROTECTED – No mirroring or striping regardless of the redundancy setting.
MIRROR – Two-way mirroring for normal redundancy and three-way mirroring for high redundancy. This attribute cannot be set for external redundancy.
COARSE – Specifies lower granuality for striping. This attribute cannot be set for external redundancy.
FINE – Specifies higher granularity for striping. This attribute cannot be set for external redundancy.
Directories
A directory heirarchy can be defined using the ALTER DISKGROUP statement to support ASM file aliasing. The following examples show how ASM directories can be created, modified and deleted.
— Create a directory.
ALTER DISKGROUP disk_group_1 ADD DIRECTORY ‘+disk_group_1/my_dir’;
— Rename a directory.
ALTER DISKGROUP disk_group_1 RENAME DIRECTORY ‘+disk_group_1/my_dir’ TO ‘+disk_group_1/my_dir_2’;
— Delete a directory and all its contents.
ALTER DISKGROUP disk_group_1 DROP DIRECTORY ‘+disk_group_1/my_dir_2’ FORCE;
Aliases
Aliases allow you to reference ASM files using user-friendly names, rather than the fully qualified ASM filenames.
— Create an alias using the fully qualified filename.
ALTER DISKGROUP disk_group_1 ADD ALIAS ‘+disk_group_1/my_dir/my_file.dbf’
FOR ‘+disk_group_1/mydb/datafile/my_ts.342.3’;
— Create an alias using the numeric form filename.
ALTER DISKGROUP disk_group_1 ADD ALIAS ‘+disk_group_1/my_dir/my_file.dbf’
FOR ‘+disk_group_1.342.3’;
— Rename an alias.
ALTER DISKGROUP disk_group_1 RENAME ALIAS ‘+disk_group_1/my_dir/my_file.dbf’
TO ‘+disk_group_1/my_dir/my_file2.dbf’;
— Delete an alias.
ALTER DISKGROUP disk_group_1 DELETE ALIAS ‘+disk_group_1/my_dir/my_file.dbf’;
Attempting to drop a system alias results in an error.
Files
Files are not deleted automatically if they are created using aliases, as they are not Oracle Managed Files (OMF), or if a recovery is done to a point-in-time before the file was created. For these circumstances it is necessary to manually delete the files, as shown below.
— Drop file using an alias.
ALTER DISKGROUP disk_group_1 DROP FILE ‘+disk_group_1/my_dir/my_file.dbf’;
— Drop file using a numeric form filename.
ALTER DISKGROUP disk_group_1 DROP FILE ‘+disk_group_1.342.3’;
— Drop file using a fully qualified filename.
ALTER DISKGROUP disk_group_1 DROP FILE ‘+disk_group_1/mydb/datafile/my_ts.342.3’;
Checking Metadata
The internal consistency of disk group metadata can be checked in a number of ways using the CHECK clause of the ALTER DISKGROUP statement.
— Check metadata for a specific file.
ALTER DISKGROUP disk_group_1 CHECK FILE ‘+disk_group_1/my_dir/my_file.dbf’
— Check metadata for a specific failure group in the disk group.
ALTER DISKGROUP disk_group_1 CHECK FAILGROUP failure_group_1;
— Check metadata for a specific disk in the disk group.
ALTER DISKGROUP disk_group_1 CHECK DISK diska1;
— Check metadata for all disks in the disk group.
ALTER DISKGROUP disk_group_1 CHECK ALL;
5. ASM Views
| View | ASM Instance | DB Instance |
| V$ASM_ALIAS | Displays a row for each alias present in every disk group mounted by the ASM instance. | Returns no rows |
| V$ASM_CLIENT | Displays a row for each database instance using a disk group managed by the ASM instance. | Displays a row for the ASM instance if the database has open ASM files. |
| V$ASM_DISK | Displays a row for each disk discovered by the ASM instance, including disks which are not part of any disk group. | Displays a row for each disk in disk groups in use by the database instance. |
| V$ASM_DISKGROUP | Displays a row for each disk group discovered by the ASM instance. | Displays a row for each disk group mounted by the local ASM instance. |
| V$ASM_FILE | Displays a row for each file for each disk group mounted by the ASM instance. | Displays no rows. |
| V$ASM_OPERATION | Displays a row for each file for each long running operation executing in the ASM instance. | Displays no rows. |
| V$ASM_TEMPLATE | Displays a row for each template present in each disk group mounted by the ASM instance. | Displays a row for each template present in each disk group mounted by the ASM instance with which the database instance communicates. |
6. ASM Filenames
There are several ways to reference ASM file. Some forms are used during creation and some for referencing ASM files. The forms for file creation are incomplete, relying on ASM to create the fully qualified name, which can be retrieved from the supporting views. The forms of the ASM filenames are summarised below.
| Filename Type | Format |
| Fully Qualified ASM Filename | +dgroup/dbname/file_type/file_type_tag.file.incarnation |
| Numeric ASM Filename | +dgroup.file.incarnation |
| Alias ASM Filenames | +dgroup/directory/filename |
| Alias ASM Filename with Template | +dgroup(template)/alias |
| Incomplete ASM Filename | +dgroup |
| Incomplete ASM Filename with Template | +dgroup(template) |
SQL and ASM
ASM filenames can be used in place of conventional filenames for most Oracle file types, including controlfiles, datafiles, logfiles etc. For example, the following command creates a new tablespace with a datafile in the disk_group_1 disk group.
CREATE TABLESPACE my_ts DATAFILE ‘+disk_group_1’ SIZE 100M AUTOEXTEND ON;
7. Migrating to ASM Using RMAN
The following method shows how a primary database can be migrated to ASM from a disk based backup:
- Disable change tracking (only available in Enterprise Edition) if it is currently being used.
SQL> ALTER DATABASE DISABLE BLOCK CHANGE TRACKING;
- Shutdown the database.
SQL> SHUTDOWN IMMEDIATE
- Modify the parameter file of the target database as follows:
- Set the DB_CREATE_FILE_DEST and DB_CREATE_ONLINE_LOG_DEST_n parameters to the relevant ASM disk groups.
- Remove the CONTROL_FILES parameter from the spfile so the control files will be moved to the DB_CREATE_* destination and the spfile gets updated automatically. If you are using a pfile the CONTROL_FILES parameter must be set to the appropriate ASM files or aliases.
- Start the database in nomount mode.
RMAN> STARTUP NOMOUNT
- Restore the controlfile into the new location from the old location.
RMAN> RESTORE CONTROLFILE FROM ‘old_control_file_name’;
- Mount the database.
RMAN> ALTER DATABASE MOUNT;
- Copy the database into the ASM disk group.
RMAN> BACKUP AS COPY DATABASE FORMAT ‘+disk_group’;
- Switch all datafile to the new ASM location.
RMAN> SWITCH DATABASE TO COPY;
- Open the database.
RMAN> ALTER DATABASE OPEN;
- Create new redo logs in ASM and delete the old ones.
- Enable change tracking if it was being used.
SQL> ALTER DATABASE ENABLE BLOCK CHANGE TRACKING;
8. Oracle 11g Features
New Disk Group Compatibility Attributes
Oracle 11g ASM includes two new compatibility attributes that determine the version of the ASM and database software that can use specific disk groups:
- COMPATIBLE.ASM – The minimum version of the ASM software that can access the disk group. In 11g, the default setting is 10.1.
- COMPATIBLE.RDBMS – The minimum COMPATIBLE database initialization parameter setting for any database instance that uses the disk group. In 11g, the default setting is 10.1.
The compatibility versions of a disk group can only be increased, not decreased. If you have increased the version by mistake, you will need to create a new disk group.
The disk group compatibility attributes can be set during disk group creation by adding the ATTRIBUTE clause to the CREATE DISKGROUP command.
CREATE DISKGROUP data DISK ‘/dev/raw/*’
ATTRIBUTE ‘compatible.asm’ = ‘11.1’;
CREATE DISKGROUP data DISK ‘/dev/raw/*’
ATTRIBUTE ‘compatible.rdbms’ = ‘11.1’, ‘compatible.asm’ = ‘11.1’;
The disk group compatibility attributes for existing disk groups can be altered using the SET ATTRIBUTE clause to the ALTER DISKGROUP command.
ALTER DISKGROUP data SET ATTRIBUTE ‘compatible.asm’ = ‘11.1’;
ALTER DISKGROUP data SET ATTRIBUTE ‘compatible.rdbms’ = ‘11.1’;
The current compatibility settings are available from the V$ASM_DISKGROUP and V$ASM_ATTRIBUTE views.
COLUMN name FORMAT A10
COLUMN compatibility FORMAT A20
COLUMN database_compatibility FORMAT A20
SELECT group_number, name, compatibility, database_compatibility FROM v$asm_diskgroup;
GROUP_NUMBER NAME COMPATIBILITY DATABASE_COMPATIBILI
———— ———- ——————– ——————–
1 DATA 11.1.0.0.0 11.1.0.0.0
1 row selected.
SQL>
COLUMN name FORMAT A20
COLUMN value FORMAT A20
SELECT group_number, name, value FROM v$asm_attribute ORDER BY group_number, name;
GROUP_NUMBER NAME VALUE
———— ——————– ——————–
1 au_size 1048576
1 compatible.asm 11.1.0.0.0
1 compatible.rdbms 11.1
1 disk_repair_time 3.6h
4 rows selected.
SQL>
9. Fast Mirror Resync
During transient disk failures within a failure group, ASM keeps track of the changed extents that need to be applied to the offline disk. Once the disk is available, only the changed extents are written to resynchronize the disk, rather than overwriting the contents of the entire disk. This can speed up the resynchronization process considerably.
Fast mirror resync is only available when the disk groups compatibility attributes are set to 11.1 or higher.
ALTER DISKGROUP disk_group_1 SET ATTRIBUTE ‘compatible.asm’ = ‘11.1’;
ALTER DISKGROUP disk_group_1 SET ATTRIBUTE ‘compatible.rdbms’ = ‘11.1;
ASM drops disks if they remain offline for more than 3.6 hours. The disk groups default time limit is altered by changing the DISK_REPAIR_TIME parameter with a unit of minutes (M or m) or hours (H or h).
— Set using the hours unit of time.
ALTER DISKGROUP disk_group_1 SET ATTRIBUTE ‘disk_repair_time’ = ‘4.5h’;
— Set using the minutes unit of time.
ALTER DISKGROUP disk_group_1 SET ATTRIBUTE ‘disk_repair_time’ = ‘300m’;
The DROP AFTER clause of the ALTER DISKGROUP command is used to override the disk group default DISK_REPAIR_TIME.
— Use the default DISK_REPAIR_TIME for the diskgroup.
ALTER DISKGROUP disk_group_1 OFFLINE DISK D1_0001;
— Override the default DISK_REPAIR_TIME.
ALTER DISKGROUP disk_group_1 OFFLINE DISK D1_0001 DROP AFTER 30m;
If a disk goes offline during a rolling upgrade, the timer is not started until after the rolling upgrade is complete.
10. Rolling Upgrade
Clustered ASM instances for 11g onwards can be upgraded using a rolling upgrade. The ASM cluster is placed in rolling upgrade mode by issuing the following command from one of the nodes.
ALTER SYSTEM START ROLLING MIGRATION TO 11.2.0.0.0;
Once the cluster is in rolling upgrade mode each node in turn can be shutdown, upgraded and started. The cluster runs in a mixed version environment until the upgrade is complete. In this state, the cluster is limited to the following operations:
- Mount and dismount of the disk groups.
- Open, close, resize, and delete of database files.
- Access to local fixed views and fixed packages.
The current status of the ASM cluster can be determined using the following query.
SELECT SYS_CONTEXT(‘sys_cluster_properties’, ‘cluster_state’) FROM dual;
Once the last node is upgraded, the rolling upgrade is stopped by issuing the following command, which checks all ASM instances are at the appropriate version, turns off rolling upgrade mode and restarts any pending rebalance operations.
ALTER SYSTEM STOP ROLLING MIGRATION;
Restrictions and miscellaneous points about the rolling upgrade process include:
- The Oracle clusterware must be fully patched before an ASM rolling upgrade is started.
- Rolling upgrades are only available from 11g onwards, so this method is not suitable for 10g to 11g upgrades.
- This method can be used to rollback to the previous version if the rolling upgrade fails before completion.
- If the upgrade fails, any rebalancing operations must complete before a new upgrade can be attempted.
- New instances joining the cluster during a rolling upgrade are automatically placed in rolling upgrade mode.
- If all instances in a cluster are stopped during a rolling upgrade, once the instances restart they will no longer be in rolling upgrade mode. The upgrade must be initiated as if it were a new process.
11. SYSASM Privilege and OSASM OS Group
The introduction of ASM moved the management of storage away from system adminstrators and into the DBA territory. Unfortunately this isn’t how every company operates. As a result, some system administrators were required to have access to privileged users to handle disk storage. Oracle addresses this issue with the introduction of the SYSASM privilege and the OSASM operating system group, which provide two mechanisms to enable the separation of storage and database administration duties.
Users can be created in the ASM instance in a similar manner to database users. Granting these users the SYSASM privilege allows them to connect to the ASM instance and perform administration tasks. First, connect to the ASM instance.
$ export ORACLE_SID=+ASM
$ sqlplus / as sysasm
Next, create a new user in the ASM instance and grant it the SYSASM privilege. The user is now able to connect using SYSASM.
SQL> CREATE USER asm_user_1 IDENTIFIED by asm_password;
User created.
SQL> GRANT SYSASM TO asm_user_1;
Grant succeeded.
SQL> CONN asm_user_1/asm_password AS SYSASM
Connected.
SQL>
Alternatively, assigning an operating system user to the OSASM group (asmadmin) allows then to connect as SYSASM using OS authentication. The following example creates a new OS user assigned to the OSASM group (asmadmin), which is immediately able to connect using SYSASM.
# useradd tim_hall -G asmadmin
# su – tim_hall
$ export ORACLE_SID=+ASM
$ export ORACLE_HOME=/u01/app/oracle/product/11.1.0/db_1
$ $ORACLE_HOME/bin/sqlplus / as sysasm
SQL*Plus: Release 11.1.0.6.0 – Production on Fri Aug 8 16:48:37 2008
Copyright (c) 1982, 2007, Oracle. All rights reserved.
Connected to:
Oracle Database 11g Enterprise Edition Release 11.1.0.6.0 – Production
With the Partitioning, OLAP, Data Mining and Real Application Testing options
SQL>
12. Scalability and Performance Enhancements
ASM files are stored in a disk group as a collection of extents. In Oracle 10g each extent mapped directly to one allocation unit (AU), but in Oracle 11g an extent can be made up of one or more allocation units. As files get larger, the extent size can grow to reduce the size of the extent map describing the file, thus saving memory.
When the disk group compatibility attributes are set to 11.1 or higher, the extent size will automatically grow as the file grows. The first 20,000 extents match the allocation unit size (1*AU). The next 20,000 extents are made up of 8 allocation units (8*AU). Beyond that point, the extent size becomes 64 allocation units (64*AU).
In addition to the automatic expansion of the extent sizes, Oracle 11g also allows control over the allocation unit size using the ATTRIBUTE clause in the CREATE DISKGROUP statement, with values ranging from 1M to 64M.
CREATE DISKGROUP disk_group_2
EXTERNAL REDUNDANCY
DISK ‘/dev/sde1’
ATRRIBUTE ‘au_size’ = ’32M’;
The combination of expanding extent sizes and larger allocation units should result in increased I/O performance for very large databases.
13. New ASMCMD Commands and Options
The ASM command line utility includes several new commands. The following example output assumes you have already started the utility using the “-p” option.
$ asmcmd -p
ASMCMD [+] >
The usage notes for each command is available by issuing the “help <command>” command from within the asmcmd utility, so I will avoid displaying all this information here.
The lsdsk command lists information about ASM disks from the V$ASM_DISK_STAT and V$ASM_DISK views. The summary usage is shown below.
lsdsk [-ksptcgHI] [-d <diskgroup_name>] [pattern]
An example of the output from the basic command and the “-k” option are shown below.
ASMCMD [+] > lsdsk
Path
/dev/sdc1
/dev/sdd1
/dev/sde1
ASMCMD [+] > lsdsk -d data -k
Total_MB Free_MB OS_MB Name Failgroup Library Label UDID Product Redund Path
8189 6961 8189 DATA_0000 DATA_0000 System UNKNOWN /dev/sdc1
8189 6961 8189 DATA_0001 DATA_0001 System UNKNOWN /dev/sdd1
8189 6950 8189 DATA_0002 DATA_0002 System UNKNOWN /dev/sde1
ASMCMD [+] >
The cp command allows files to be copied between ASM and local or remote destinations. The summary usage is shown below.
cp [-ifr] <[\@connect_identifier:]src> <[\@connect_identifier:]tgt>
The following example copies the current USERS datafile from ASM to the local file system.
ASMCMD [+] > cp +DATA/db11g/datafile/users.273.661514191 /tmp/users.dbf
source +DATA/db11g/datafile/users.273.661514191
target /tmp/users.dbf
copying file(s)…
file, /tmp/users.dbf, copy committed.
ASMCMD [+] >
There seems to be some concern that the cp command doesn’t work for control files (here).
The md_backup command makes a copy of the metadata for one or more disk groups. The summary usage is shown below.
md_backup [-b location_of_backup] [-g dgname [-g dgname …]]
An example of the command is shown below. The resulting file contains all the metadata needed to recreate the ASM setup.
ASMCMD [+] > md_backup -b /tmp/backup.txt -g data
Disk group to be backed up: DATA
ASMCMD [+] >
The md_restore command allows you to restore a disk group from the metadata created by the md_backup command. It also allows a certain amount of manipulation of the final disk groups during the restore. The summary usage is shown below.
md_restore -b <backup_file> [-li]
[-t (full)|nodg|newdg] [-f <sql_script_file>]
[-g ‘<diskgroup_name>,<diskgroup_name>,…’]
[-o ‘<old_diskgroup_name>:<new_diskgroup_name>,…’]
A straight restore of the backup shown previously is shown below.
ASMCMD [+] > md_restore -b /tmp/backup.txt -t full -g data
The remap command repairs a range of physical blocks on disk. The contents of each block is not validated, so only blocks exhibiting read errors are repaired. The summary usage is shown below.
remap <disk group name> <disk name> <block range>
An example of the command is show below.
ASMCMD [+] > remap data data_0001 5000-5999
For detailed usage information see the ASMCDM Command Reference.
14. Copy backup from ASM diskgroup to another ASM diskgroup to remote host
asmcmd
cd +EOCDATA/backup
cp primary_bkp_for_stndby_bjr03dba_1_1 sys/oraeocprod@172.22.203.170.+ASM1:+EOCFRA/bkp/primary_bkp_for_stndby_bjr03dba_1_1
15. Preferred Read Failure Groups
In Oracle 10g, ASM always reads the primary copy of the mirrored extent set. This isn’t a problem when both nodes and both failure groups are all located in the same site, but it can be inefficient for extended clusters, causing needless network traffic. Oracle 11g allows each node to define a preferred failure group, allowing nodes in extended clusters to access local failure groups in preference to remote ones.
To configure preferred read failure groups the disk group compatibility attributes must be set to 11.1 or higher. Once the compatibility options are correct, the ASM_PREFERRED_READ_FAILURE_GROUPS parameter is set to the preferred failure groups for each node.
SELECT name, failgroup FROM v$asm_disk;
NAME FAILGROUP
—————————— ——————————
DATA_0000 DATA_0000
DATA_0001 DATA_0001
DATA_0002 DATA_0002
3 rows selected.
SQL>
ALTER SYSTEM SET ASM_PREFERRED_READ_FAILURE_GROUPS = ‘data.data_0000’, ‘data.data_0001’, ‘data.data_0002’;
16. Fast Rebalance
The “ALTER DISKGROUP … MOUNT” statement allows disk groups to be mounted in restricted mode.
SQL> SELECT name FROM v$asm_diskgroup;
NAME
——————————
DATA
SQL> ALTER DISKGROUP data DISMOUNT;
Diskgroup altered.
SQL> ALTER DISKGROUP data MOUNT RESTRICTED;
Diskgroup altered.
SQL> ALTER DISKGROUP data DISMOUNT;
Diskgroup altered.
SQL> ALTER DISKGROUP data MOUNT;
Diskgroup altered.
SQL>
In a RAC environment, a disk group mounted in RESTRICTED mode can only be accessed by a single instance. The restricted disk group is not available to any ASM clients, even on the node where it is mounted.
Using RESTRICTED mode improves the performance of rebalance operations in a RAC environment as it elimitates the need for lock and unlock extent map messaging that occurs between ASM instances. Once the rebalance operation is complete, the disk group should be dismounted then mounted in NORMAL mode (the default).
Q. Miscellaneous Disk Group Maintenance Enhancements
- The CREATE DISKGROUP and ALTER DISKGROUP commands include a new ATTRIBUTE clause (compatible, disk_repair_time, au_size).
- The CHECK clause of the ALTER DISKGROUP command has been simplified so there are only two options, NOREPAIR and REPAIR, available, with NOREPAIR as the default. Summarized errors are displayed, with full error messages writen to the alert log.
- ALTER DISKGROUP data CHECK; — Like NOREPAIR
- ALTER DISKGROUP data CHECK NOREPAIR;
ALTER DISKGROUP data CHECK REPAIR;
- Disk groups can now be mounted in restricted mode, which can improve performance of some maintenance tasks.
- The ALTER DISKGOUP command now includes ONLINE and OFFLINE clauses so disks can be taken offline for repair before being brought back online.
- — Individual disks.
- ALTER DISKGROUP data OFFLINE DISK ‘disk_0000’, ‘disk_0001’;
- ALTER DISKGROUP data ONLINE DISK ‘disk_0000’, ‘disk_0001’;
- — Failure groups.
- ALTER DISKGROUP data OFFLINE DISKS IN FAILGROUP ‘fg_0000’;
- ALTER DISKGROUP data ONLINE DISKS IN FAILGROUP ‘fg_0000’;
- — Bring online all disks in disk group.
ALTER DISKGROUP data ONLINE ALL;
- Disk groups that can’t be mounted by ASM can now be dropped using the FORCE keyword of the DROP DISKGROUP command.
DROP DISKGROUP data FORCE;


No comments:
Post a Comment