How to add a node in oracle RAC 19c
Below are the steps for adding a node in oracle 19c RAC.
STEP OVERVIEW:
- Add the new node using gridSetup.sh
- Extend oracle database home to new node using addnode.sh
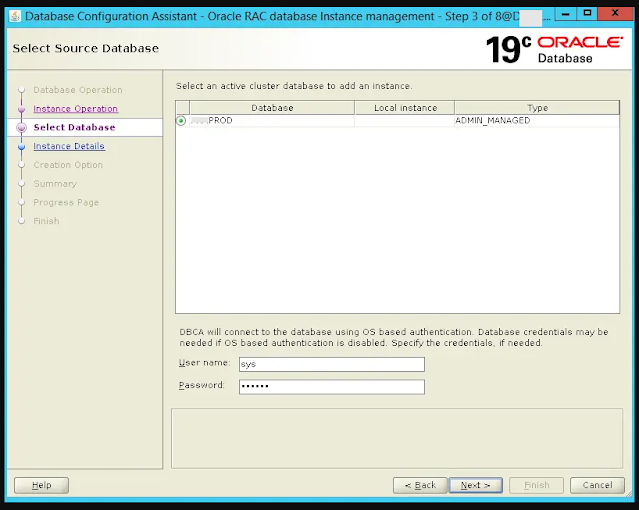
- Add the database instance to new node using dbca
DEMO
In this demo, we will add new node dbhost04, to existing node dbhost03( where grid is already running)
existing node( node1) -> DBHOST01
existing node( node2) -> DBHOST02
New node(node3). ->DBHOST03 ( to be added)
GRID_HOME ->/crsapp/app/oracle/product/19c
ORACLE_HOME -> /oracle/app/oracle/product/19.3.0/dbhome_1
1. Run gridsetup.sh script from existing node ( DBHOST01)
dbhost01$ export GRID_HOME=/crsapp/app/oracle/product/19c
dbhost01$ cd $GRID_HOME
dbhost01$./gridSetup.sh
Run root.sh script from the new node DBHOST03 - New Node
[root@DBHOST03 /]# /crsapp/app/oracle/product/19c/root.sh
Performing root user operation.

The following environment variables are set as:
    ORACLE_OWNER= oracle
    ORACLE_HOME=  /crsapp/app/oracle/product/19c

Enter the full pathname of the local bin directory: [/usr/local/bin]:
The contents of "dbhome" have not changed. No need to overwrite.
The contents of "oraenv" have not changed. No need to overwrite.
The contents of "coraenv" have not changed. No need to overwrite.


Creating /etc/oratab file...
Entries will be added to the /etc/oratab file as needed by
Database Configuration Assistant when a database is created
Finished running generic part of root script.
Now product-specific root actions will be performed.
Relinking oracle with rac_on option
Using configuration parameter file: /crsapp/app/oracle/product/19c/crs/install/crsconfig_params
The log of current session can be found at:
  /crsapp/app/oracle_base/crsdata/DBHOST03/crsconfig/rootcrs_DBHOST04_2021-06-22_12-39-53AM.log
2021/06/22 12:39:56 CLSRSC-594: Executing installation step 1 of 19: 'SetupTFA'.
2021/06/22 12:39:56 CLSRSC-594: Executing installation step 2 of 19: 'ValidateEnv'.
2021/06/22 12:39:56 CLSRSC-363: User ignored prerequisites during installation
2021/06/22 12:39:56 CLSRSC-594: Executing installation step 3 of 19: 'CheckFirstNode'.
2021/06/22 12:39:57 CLSRSC-594: Executing installation step 4 of 19: 'GenSiteGUIDs'.
2021/06/22 12:40:03 CLSRSC-594: Executing installation step 5 of 19: 'SetupOSD'.
Redirecting to /bin/systemctl restart rsyslog.service
2021/06/22 12:40:03 CLSRSC-594: Executing installation step 6 of 19: 'CheckCRSConfig'.
2021/06/22 12:40:05 CLSRSC-594: Executing installation step 7 of 19: 'SetupLocalGPNP'.
2021/06/22 12:40:06 CLSRSC-594: Executing installation step 8 of 19: 'CreateRootCert'.
2021/06/22 12:40:06 CLSRSC-594: Executing installation step 9 of 19: 'ConfigOLR'.
2021/06/22 12:40:17 CLSRSC-594: Executing installation step 10 of 19: 'ConfigCHMOS'.
2021/06/22 12:40:17 CLSRSC-594: Executing installation step 11 of 19: 'CreateOHASD'.
2021/06/22 12:40:18 CLSRSC-594: Executing installation step 12 of 19: 'ConfigOHASD'.
2021/06/22 12:40:19 CLSRSC-330: Adding Clusterware entries to file 'oracle-ohasd.service'
2021/06/22 12:41:08 CLSRSC-4002: Successfully installed Oracle Trace File Analyzer (TFA) Collector.
2021/06/22 12:41:35 CLSRSC-594: Executing installation step 13 of 19: 'InstallAFD'.
2021/06/22 12:41:35 CLSRSC-594: Executing installation step 14 of 19: 'InstallACFS'.
2021/06/22 12:43:15 CLSRSC-594: Executing installation step 15 of 19: 'InstallKA'.
2021/06/22 12:43:17 CLSRSC-594: Executing installation step 16 of 19: 'InitConfig'.
2021/06/22 12:43:25 CLSRSC-594: Executing installation step 17 of 19: 'StartCluster'.
2021/06/22 12:44:31 CLSRSC-343: Successfully started Oracle Clusterware stack
2021/06/22 12:44:31 CLSRSC-594: Executing installation step 18 of 19: 'ConfigNode'.
clscfg: EXISTING configuration version 19 detected.
Successfully accumulated necessary OCR keys.
Creating OCR keys for user 'root', privgrp 'root'..
Operation successful.
2021/06/22 12:44:50 CLSRSC-594: Executing installation step 19 of 19: 'PostConfig'.
2021/06/22 12:44:58 CLSRSC-325: Configure Oracle Grid Infrastructure for a Cluster ... succeeded
Check the cluster resources:
crsctl stat res -t2. Extend oracle database home to new node using addnode.sh
If oracle database home is installed on existing node, then we need to extend the same oracle_home to new node. addnode.sh script need to be run from the existing node.
— Run from existing node[ DBHOST01 ]
dbhost01$cd $ORACLE_HOME/addnode
dbhost01$./addnode.sh “CLUSTER_NEW_NODES={DBHOST03}”
Below GUI window will be opened
-- It will ask to Run on new node DBHOST03
[root@DBHOST03 /]# /oracle/app/oracle/product/19.3.0/dbhome_1/root.sh
Performing root user operation.

The following environment variables are set as:
    ORACLE_OWNER= oracle
    ORACLE_HOME=  /oracle/app/oracle/product/19.3.0/dbhome_1

Enter the full pathname of the local bin directory: [/usr/local/bin]:
The contents of "dbhome" have not changed. No need to overwrite.
The contents of "oraenv" have not changed. No need to overwrite.
The contents of "coraenv" have not changed. No need to overwrite.

Entries will be added to the /etc/oratab file as needed by
Database Configuration Assistant when a database is created
Finished running generic part of root script.
Now product-specific root actions will be performed.
3. Add the instance on node using dbca utility( run on dbhost01)
dbhost01$ cd $ORACLE_HOME/bin
dbhost01$ ./dbca


No comments:
Post a Comment